Featherweights

 the pretty Featherweightsweighs all in a row

….the pretty Featherweights all in a row

This is a photo of my Singer Featherweight collection, the one in front was an unexpected gift from one of the employees of our home builder. He had seen all the sewing machines that I had and said his Grandmother had one laying around and that he would drop it off one day. A few weeks later, I found this baby sitting on my doorstep. She was quite neglected, smelly, dirty etc., the case was not salvageable since it had sit out in garage for quite a while. I aired her out, cleaned her up. She runs beautifully and it’s a scroll!

scrollmachine

April 10, 1940

The white machine was the second I bought back in the 1990’s. Not quite sure when I bought her. Runs lovely!

white

1964

This was the first machine I bought, also in the 1990’s. I have one from three different decades!

myfirst

December 12, 1952

Machine Quilting

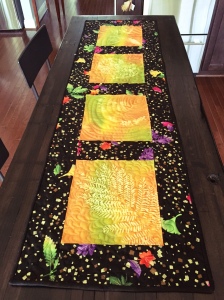
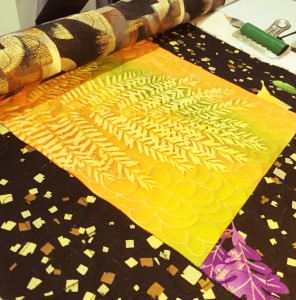
I’ve recently finished a large quilt (except for the border-fabric ordered-not yet arrived) that will need to be quilted soon. I’ve had a Nolting Hobby Quilter since about 2004-2005 ish. Cannot quite remember the date. Serial Number is HQ0241. All that is really not relevant. Anyway, I’ve quilted with it a lot over the years, some quilts were wonderful to work on, others not so much. I’ve learned how to do hook timing, and I have even replaced the rotary hook about a year and a half ago. That was really the best repair. Now my timing is perfect and my tension is spot on. So I am practicing before I finish the big quilt. i bought these sun dyed blocks years and years ago, and sometime in the last few years, I sewed them up into a table runner, and there it sat. So today I dug it out and put it on the frame to practice with. I really hate to practice uselessly. I decided to try out a few different all over quilting patterns.

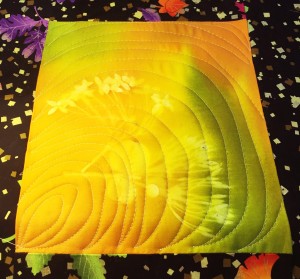
This quilting is loops stacked up on each other:

IMG_0271

Loops

This quilting is a basic meander:

IMG_0274

Meander

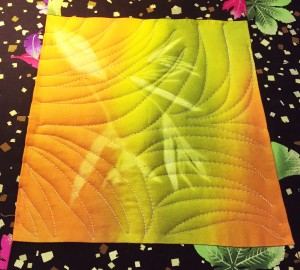
This quilting is wavy curved lines:

IMG_0272

Curved lines

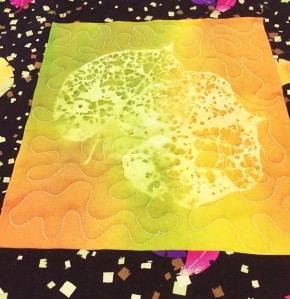
This is a variation of the above but coming from all four quadrants:

IMG_0276 (1)

my favorite!

What I’ve learned from this exercise is :

  • it is a good thing that I bought a black quilt batting for the big quilt, since it is predominantly black.
  • the machine timing and tension is perfect with Aurifil 50 weight thread. Every time I try something different, it is a disaster. So I need to stick with this thread.
  • I can do a meander without making sharp points, as I am inclined to do.
  • I can quilt a pattern other than a fancy feather meander, as I usually do. Important for this next quilt as it is intended to be more masculine.

And the finished product- will look lovely at Halloween!

image

Tutorial: See-Through Front-Zipper Bag

Back in January, I posted about a similar pattern that I had purchased which had minimal directions at best. I made one anyway. IMG_0263There was a lot of swearing and ripping. It took me forever because the directions were so vague. My daughter Katie, who is a writer/editor by day and studies Russian by night, thought it would be perfect to store her Russian dictionary and her flashcards. Below is my version: it’s bigger, has fewer pieces and features a front zipper instead of the top zipper (so much easier to execute so that it looks perfect – the top zipper can look messy if you are not super-careful). IMG_0264

Now both bags-side by side.IMG_0265

So I made another, and the bag below is featured in this tutorial.  This is my first time posting a tutorial so please feel free to give me constructive criticism, especially if the directions are not clear enough and/or if I need more pictures.

See-through front-zipper bag tutorial

Materials:

  • 2 fat quarters  (main and lining fabric) (if your fabric is directional you may need more fabric)
  • Heavy weight clear vinyl
  • Heavy weight fusible interfacing (I used Decor Bond)
  • Light weight fusible interfacing (I used a generic light weight)
  • 14″ or longer zipper
Photo 1: All Pieces
Photo 2: Main Fabric Cutting Layout
Photo 3: Lining Fabric Cutting Layout
Photo 4: Piece names


  1. Cut materials as follows:
    • Vinyl: one 5″x12″
    • Main fabric (A): one 12″x12″, two 2″x12″, one 3.5″x12″. See Photo 2  for layout diagram.
    • Lining fabric (B): one 12″x12″, two 2.75″x12″, one 4″x12″. See Photo 3 for layout diagram.   (Note: The smaller lining pieces are a bit oversized but will be trimmed later.)
  2. Cut heavy weight fusible interfacing for all the main fabric pieces, and iron on.
  3. Cut lightweight fusible interfacing for the lining and iron on.
  4. Sew A2 and A3  to vinyl using Teflon foot, if possible.  Iron seams carefully. Do not let iron touch the vinyl.
  5. Place zipper wrong side down on A2/A3 pieced front. Stitch zipper to fabric. I used a very tiny zipper foot, approx. 1/8″ seam.
  6. Line up corresponding lining piece right side down on top of wrong side of zipper. Stitch. (Note in photo below, left edge is not lined up. This is only to illustrate the layering. Line up the left edge before you stitch.
  7. Repeat with piece A1 and stitch to top of zipper.
  8. Line up bottom of lining on A2 that overlaps onto the vinyl, fold under so that the lining lines up with the edge of the main fabric sewn to the top of the vinyl.
  9. Fold back lining and topstitch. Topstitch all other pieces of front.
  10. Trim top and bottom lining piece even with top and bottom of A2 and A3, respectively.
  11. Stitch each end of the zipper to keep together.
  12. Trim piece even.
  13. Sandwich C1 and C2 wrong sides together. Pin. Then layer C sandwich and A zipper front, right side together, and trim again.
  14. Stitch around all edges.
  15. Then either serge edges or use a zigzag stitch to finish edges.
  16. Measure as shown (2.5″) inches from the point at the bottom, and draw a pencil line across. Repeat on the other corner.
  17.  Stitch across each corner, twice, with a tiny space between each line of stitching.
  18. Cut corner off, leaving approximately .5″. Serge or zigzag to finish.
  19. Turn right side out, add a small key ring to zipper, tie a bit of ribbon on it and voila!

February to April

It’s hard to believe it’s April already. The weather has been hot and cold and windy and rainy. We’ve been back from Hawaii for a month. I did not post at all during our trip. Week 1 was fun.imageWeek 2 and 3, I had the flu and spent most of my time, coughing or sleeping. Sick in paradise is better than sick in snow. Week 4 was mostly spent by the pool in disbelief that we were going home soon. We did spend a few days in Volcano. Cooler, close to Mauna Kea, which is awesome at night.image

I did knit a little, and finished this shawl when I got home.

imageimage

Almost February

We survived the great “snowzilla” snowstorm here in Maryland. Our area was in the bullseye of the storm and we got more than 36 inches of snow. We needed to shovel our way out of the house on the back deck, but our front steps were miraculously clear.

Below is the hat I knit while it was snowing last weekend. This is the second one I’ve done, and I’ve got enough yarn packed in my suitcase to do a couple of more while I am sitting by the pool, as tomorrow we are off on our yearly trip to Hawaii, and I am ready for some sun and warm weather. Lots of knitting will be done.


Flying

I probably am the most irritable airline passenger ever. Whistling on tiny plane is like torture to me. Don’t other people have any sense of what lies beyond the border of their own bodies? I don’t want to hear anyone whistling. I don’t want to hear a blow by blow discussion of a movie. I don’t want to hear the guy behind me talking loudly on the phone (when it should have already been turned off) about wether or not he would be guest lecturing again at Harvard. 

On the plus side, I am on an Embraer 145 a very small jet, that seems to instantly arrive at its cruising altitude, I am sitting in seat 1A, a lone and solitary seat. And there is this beautiful view. Plus, I should be home in an hour…very short flight.

Times have changed.

I saw this small bag pattern on Pinterest,

and was hoping I would find a tutorial, but there was none, just a pattern to buy and not a downloadable pattern, but a printed pattern, so I ordered it.

STpeekaboobag_LRGWhen it came on Saturday, I was quite disappointed in what I received. Basically it was a one page booklet with a few measurements, and some written instructions. It was written in 2010, and in the six years since then, I think expectations of what a pattern should include have changed. I won’t buy another pattern I can’t download. Period. I also expect that there be some tutorial with photos, since many folks (me included) are visual learners. I will use the pattern nonetheless and post the output when i am done.

Ugly reimagined

O over dyed the ugly in the previous post (bottom photo) with a rich chocolate brown. I love how it turned out.

2016

I am a little late to the party for New Year’s Resolutions, but I have made some progress on my number 1 goal…finish UFO’s. So far I have frogged two projects completely, reskeined, and soaked so one bunch can be used again as is, and the other needs overdyeing because it was really awful knitted up in stockinette!

I am keeping this one. It’s hand dyed by me, DK weight and a merino, cashmere blend.

This one is going to be over dyed, as I think it is so very ugly.

Planks in Paradise

Aside from finishing my unfinished works specified in the last post (on the foot of the lonely sock already), while here in Paradise, I resolved to stay on the diet I started in early January, and so far i have, and exersize significantly every day (two minute plank-yeah!!), and so far I have. Two lbs down…so I think it is working, and I will do everything in my power to keep at it.

The weather is beginning to be awful at home, which makes me happier still I am here, but worried about family and friends back home.